お久しぶりです。 3 月のライオンの 17 巻が発売されたので早速読みました。 非常に良かったですね。
今回は Cilium の新しい機能である BGP Control Plane を動かすついでに Containerlab にも入門しました。
# とりあえず動かしたい方へ
前提知識は既に取得しているのでとりあえず動かしたり,どういう感じで動かしたのかを知りたい方はスクリプトへのリンクを貼っておきくのでそちらを参照してください.
実験環境のトポロジーは試してみるの章をちらっと見てください.
環境を作成すると clab-cilium-bgp-cp-client0 からロードバランサーのアドレスにアクセスできるはずです.
# モチベーション
最近の興味として Kubernetes やそのネットワーク機能、 BGP などの勉強をしています。
その中で新たに Cilium に実装された BGP Control Plane を試してみたかったのですが、いい感じに動かしているドキュメントやテストを見つけられなかったのでせっかくなので Containerlab にも入門しつつ自分で動かしてみることにしました。 その手順を備忘録的に記録しておこうと思います。
(有識者の方で公式なテスト方法などを知っている方がいらっしゃれば教えていただきたいです。)
# 実験環境
今回の実験で利用した環境は以下です。
$ uname -a
Linux teradev 6.2.0-26-generic #26~22.04.1-Ubuntu SMP PREEMPT_DYNAMIC Thu Jul 13 16:27:29 UTC 2 x86_64 x86_64 x86_64 GNU/Linux
2
$ bin/kind version
kind v0.20.0 go1.20.4 linux/amd64
2
$ bin/kubectl version
Client Version: v1.28.1
Kustomize Version: v5.0.4-0.20230601165947-6ce0bf390ce3
Server Version: v1.28.0
2
3
4
$ bin/helm version
version.BuildInfo{Version:"v3.12.3", GitCommit:"3a31588ad33fe3b89af5a2a54ee1d25bfe6eaa5e", GitTreeState:"clean", GoVersion:"go1.20.7"}
2
$ bin/containerlab version
                           _                   _       _
                 _        (_)                 | |     | |
 ____ ___  ____ | |_  ____ _ ____   ____  ____| | ____| | _
/ ___) _ \|  _ \|  _)/ _  | |  _ \ / _  )/ ___) |/ _  | || \
( (__| |_|| | | | |_( ( | | | | | ( (/ /| |   | ( ( | | |_) )
\____)___/|_| |_|\___)_||_|_|_| |_|\____)_|   |_|\_||_|____/
    version: 0.44.3
     commit: cbfa6cbc
       date: 2023-08-22T12:42:06Z
     source: https://github.com/srl-labs/containerlab
 rel. notes: https://containerlab.dev/rn/0.44/#0443
2
3
4
5
6
7
8
9
10
11
12
13
14
$ kubectl -n kube-system exec cilium-2x5hc -- cilium version
Defaulted container "cilium-agent" out of: cilium-agent, config (init), mount-cgroup (init), apply-sysctl-overwrites (init), mount-bpf-fs (init), clean-cilium-state (init), install-cni-binaries (init)
Client: 1.14.1 c191ef6f 2023-08-10T18:54:57+02:00 go version go1.20.7 linux/amd64
Daemon: 1.14.1 c191ef6f 2023-08-10T18:54:57+02:00 go version go1.20.7 linux/amd64
2
3
4
# Cilium
Cilium (opens new window) とは Linux カーネルの技術である eBPF を利用したコンテナワークロードのためのプロジェクトです。 主に Kubernetes を対象として高速なネットワーク機能やネットワークのオブザーバビリティ機能を提供します。
Cilium の詳細な紹介は別の記事に譲ります。 以下の記事を参照してみてください。
- cilium.io (opens new window)
- github.com/cilium/cilium (opens new window)
- CNIのCiliumについて調べてみた (opens new window)
# BGP Control Plane
さて、本記事の主題の BGP Control Plane について紹介します。 が、その前に前提となる知識について軽く触れておこうと思います。
# Kubernetes の Service Type LoadBalancer
Kubernetes にはクラスター内部で動作するアプリケーションを公開・負荷分散する方法として Service リソースが提供されています。
Service リーソースにはいくつか種類がありますが、LoadBalancer タイプを利用すると loadBalancerIP フィールドに設定された IP アドレスを使用してアプリケーションをクラスターの外部に公開することができます。
Cilium の BGP Control Plane は BGP を用いてロードバランサーサービスの IP アドレスを外部のルーターに広告してクラスター外部との接続性を確立する機能です。
Cilium にはもともと BGP を用いてロードバランサーサービスを公開する仕組みが存在していました。この仕組みでは Metallb を利用していました。 新しい BGP Control Plane ではこれを GoBGP を使う仕組みへと置き換えています。
- Cilium BGP Control Plane(Beta) (opens new window)
- インターネット10分講座:BGP (opens new window)
- Metallb (opens new window)
- MetalLB BGP ControlPlane (deprecated) (opens new window)
- GoBGP (opens new window)
# Containerlab
Containerlab は コンテナベースのネットワーク検証環境を Yaml 形式で宣言的に構築できるツールです。 様々なベンダーの仮想ルーターのコンテナイメージが用意されていて、簡単に検証環境が作成できます。
詳しい使い方は [クイックスタート Containerlab] を参照してください。
# 試してみる
それでは試してみます。 試して見るにあたって以下の PR を参考にさせていただきました。
今回作成したスクリプトは以下にあります。
# 実験環境
今回作成するトポロジーは以下の図のようになっています。
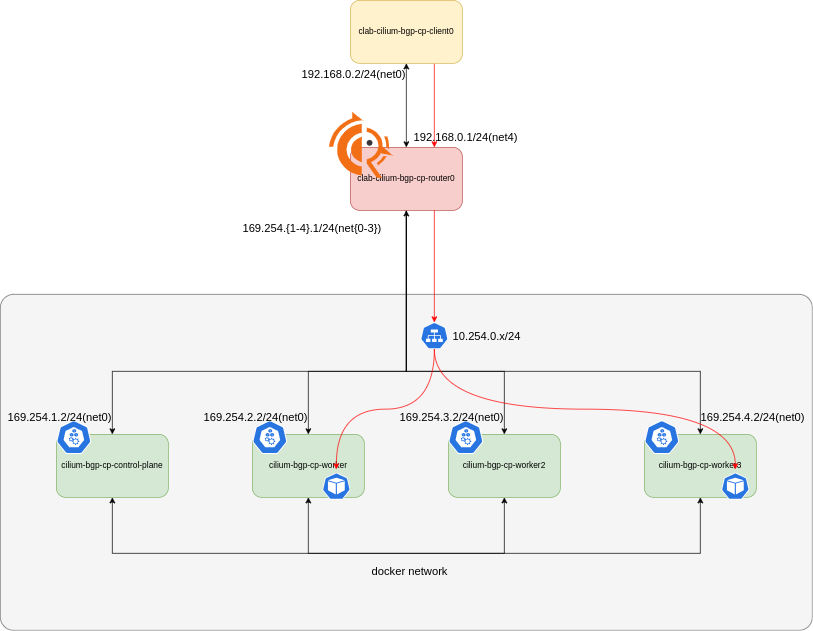
Kind で作成した Kubernetes クラスターに対して Containerlab を使って外部 router(以下 router0) と client(以下 client0) の役割を果たすコンテナを作成します。 client0 は curl をするだけのコンテナです。 router0 は frr のコンテナで BGP daemon を動かしています。 Kubernetes クラスターには Cilium をインストールして各ノード上で cilium-agent が動いています。 BGP Control Plane は cilium の一部として動作します。
この時,Kind でクラスターを作った際に同時に作成される docker network と別に外部 router と Kubernetes クラスターの各ノードと接続するインターフェースを作成しています。 このネットワークを使って router0 と各ノード間で BGP ピアを貼って経路広告を行います。
# 動かす
動作確認は Makefile 内に定義した start ターゲットで可能です。
クラスター内部には Nginx の Pod を deployment として動かしています。
この Nginx にロードバランサー経由でアクセスできることを確かめます。
構築が終わり,ロードバランサーサービスが取得出来たら client0 からロードバランサー経由でアクセスできるはずです。
$ make start
$ bin/kubectl -n test get svc
NAME              TYPE           CLUSTER-IP       EXTERNAL-IP    PORT(S)        AGE
app-svc-cluster   LoadBalancer   10.101.212.243   10.254.0.162   80:32409/TCP   14h
app-svc-local     LoadBalancer   10.101.236.199   10.254.0.55    80:30869/TCP   14h
$ docker exec -it clab-cilium-bgp-cp-client0 curl http://10.254.0.162
<!DOCTYPE html>
<html>
<head>
<title>Welcome to nginx!</title>
<style>
html { color-scheme: light dark; }
body { width: 35em; margin: 0 auto;
font-family: Tahoma, Verdana, Arial, sans-serif; }
</style>
</head>
<body>
<h1>Welcome to nginx!</h1>
<p>If you see this page, the nginx web server is successfully installed and
working. Further configuration is required.</p>
<p>For online documentation and support please refer to
<a href="http://nginx.org/">nginx.org</a>.<br/>
Commercial support is available at
<a href="http://nginx.com/">nginx.com</a>.</p>
<p><em>Thank you for using nginx.</em></p>
</body>
</html>
2
3
4
5
6
7
8
9
10
11
12
13
14
15
16
17
18
19
20
21
22
23
24
25
26
27
28
29
# 詳細
次に詳細を見ていきます。
スクリプトの全体像は Makefile (opens new window) を参照してください。
# Kind
作成する Kubernetes クラスターの定義は以下です。
今回は CNI として Cilium を動作させるので disableDefaultCNI を true にしています。
apiVersion: kind.x-k8s.io/v1alpha4
kind: Cluster
networking:
  ipFamily: dual
  disableDefaultCNI: true
  podSubnet: "10.100.0.0/16,fd00:10:255::/48"
  serviceSubnet: "10.101.0.0/16,fd00:10:0:255::/108"
nodes:
  - role: control-plane
  - role: worker
  - role: worker
  - role: worker
2
3
4
5
6
7
8
9
10
11
12
Makefile 内で Kind を使った Kubernetes クラスターの立ち上げは以下のように行っています。
@echo "CREATE THE KIND CLUSTER"
$(KIND) create cluster --image kindest/node:v$(KUBERNETES_VERSION) --config=$(KIND_CONFIG) --name $(CLUSTER_NAME)
2
# Containerlab
Containerlab の定義ファイルは以下です。
router0(clab-cilium-bgp-cp-router0) コンテナと client0(clab-cilium-bgp-cp-client0) コンテナを新たに定義しています。
router0 では ASN 65000 で BGP が動作します。
さらに、Kind で作成した Kubernetes クラスターのノードのコンテナの Network Namespace を指定してコンテナを作成し、アドレスの割当などを行っています。
links セクションでは router0 - client0 間のネットワークと、router0 - 各ノード 間のネットワークのためのインターフェースを定義しています。
name: cilium-bgp-cp
topology:
  kinds:
    linux:
      cmd: bash
  nodes:
    router0:
      kind: linux
      image: frrouting/frr:v8.4.0
      exec:
      - ip addr add 169.254.1.1/24 dev net0
      - ip addr add 169.254.2.1/24 dev net1
      - ip addr add 169.254.3.1/24 dev net2
      - ip addr add 169.254.4.1/24 dev net3
      - ip addr add 192.168.0.1/24 dev net4
      # Terminate any 10.0.0.0/8 prefix here, note that the advertisement
      # from k8s nodes will have longer prefix than /8, so they win LPM.
      - ip route add blackhole 10.0.0.0/8
      # Boiler plate to make FRR work
      - touch /etc/frr/vtysh.conf
      - sed -i -e 's/bgpd=no/bgpd=yes/g' /etc/frr/daemons
      - /usr/lib/frr/frrinit.sh start
      # FRR configuration
      - >-
        vtysh -c 'conf t'
        -c 'frr defaults datacenter'
        -c '!'
        -c 'ip prefix-list LAB-SUBNET permit 10.0.0.0/8 ge 8'
        -c '!'
        -c 'router bgp 65000'
        -c '  bgp router-id 10.0.0.0'
        -c '  bgp bestpath as-path multipath-relax'
        -c '  neighbor K8S-NODES peer-group'
        -c '  neighbor K8S-NODES remote-as external'
        -c '  neighbor 169.254.1.2 peer-group K8S-NODES'
        -c '  neighbor 169.254.2.2 peer-group K8S-NODES'
        -c '  neighbor 169.254.3.2 peer-group K8S-NODES'
        -c '  neighbor 169.254.4.2 peer-group K8S-NODES'
        -c '  address-family ipv4 unicast'
        -c '    redistribute connected'
        -c '    neighbor K8S-NODES prefix-list LAB-SUBNET out'
        -c '  exit-address-family'
        -c '!'
    control-plane0:
      kind: linux
      image: nicolaka/netshoot:latest
      network-mode: container:cilium-bgp-cp-control-plane
      exec:
      # Address for peering
      - ip addr add 169.254.1.2/24 dev net0
      # Route traffic to the lab through router
      - ip route add 10.0.0.0/8 via 169.254.1.1 dev net0
      - ip route add 192.168.0.0/24 via 169.254.1.1 dev net0
    worker0:
      kind: linux
      image: nicolaka/netshoot:latest
      network-mode: container:cilium-bgp-cp-worker
      exec:
      - ip addr add 169.254.2.2/24 dev net0
      - ip route add 10.0.0.0/8 via 169.254.2.1 dev net0
      - ip route add 192.168.0.0/24 via 169.254.2.1 dev net0
    worker1:
      kind: linux
      image: nicolaka/netshoot:latest
      network-mode: container:cilium-bgp-cp-worker2
      exec:
      - ip addr add 169.254.3.2/24 dev net0
      - ip route add 10.0.0.0/8 via 169.254.3.1 dev net0
      - ip route add 192.168.0.0/24 via 169.254.3.1 dev net0
    worker2:
      kind: linux
      image: nicolaka/netshoot:latest
      network-mode: container:cilium-bgp-cp-worker3
      exec:
      - ip addr add 169.254.4.2/24 dev net0
      - ip route add 10.0.0.0/8 via 169.254.4.1 dev net0
      - ip route add 192.168.0.0/24 via 169.254.4.1 dev net0
    client0:
      kind: linux
      image: ghcr.io/terassyi/terakoya:0.1.2
      exec:
      - ip addr add 192.168.0.2/24 dev net0
      - ip route change default via 192.168.0.1
  links:
  - endpoints: ["router0:net0", "control-plane0:net0"]
  - endpoints: ["router0:net1", "worker0:net0"]
  - endpoints: ["router0:net2", "worker1:net0"]
  - endpoints: ["router0:net3", "worker2:net0"]
  - endpoints: ["router0:net4", "client0:net0"]
2
3
4
5
6
7
8
9
10
11
12
13
14
15
16
17
18
19
20
21
22
23
24
25
26
27
28
29
30
31
32
33
34
35
36
37
38
39
40
41
42
43
44
45
46
47
48
49
50
51
52
53
54
55
56
57
58
59
60
61
62
63
64
65
66
67
68
69
70
71
72
73
74
75
76
77
78
79
80
81
82
83
84
85
86
87
88
89
Makefile 内で Containerlab によるネットワークトポロジーの作成は以下のように行っています。
@echo "CREATE TOPOLOGY"
$(SUDO) $(CONTAINERLAB) -t $(CONTAINERLAB_CONFIG) deploy
2
# Cilium
続いて、Cilium を Kubernetes クラスターにインストールします。
今回は Helm を使ってインストールします。
注目する点は BGP Control Plane を有効化するフラグです。
bgpControlPlane.enabled=true をセットして有効化しています。
Makefile 内の Cilium インストールの全体像は以下のようになります。
@echo "INSTALL CILIUM VIA HELM"
$(HELM) repo add cilium https://helm.cilium.io/
$(HELM) repo update
$(HELM) install cilium cilium/cilium \
	--version $(CILIUM_VERSION) \
	--namespace kube-system \
	--set ipv6.enabled=true \
	--set bgpControlPlane.enabled=true \
	--set ipam.mode=kubernetes \
	--set k8s.requireIPv4PodCIDR=true \
	--set k8s.requireIPv6PodCIDR=true
2
3
4
5
6
7
8
9
10
11
# Cilium BGP Control Plane 関連リソース
各ノード上で動作する cilium-agent と外部ルーター(router0) 間で BGP ピアを張るためには CiliumBGPPeeringPolicy リソースを作成する必要があります。
今回は以下のように各ノードに対して CiliumBGPPeeringPolicy リソースを作成しました。
localASN 自身の ASN を設定します。
また、 neighbors.peerAddress, neighbors.peerASN に外部ルーター(router0) のアドレスと ASN を設定します。
---
apiVersion: "cilium.io/v2alpha1"
kind: CiliumBGPPeeringPolicy
metadata:
  name: control-plane
spec:
  nodeSelector:
    matchLabels:
      kubernetes.io/hostname: cilium-bgp-cp-control-plane
  virtualRouters:
  - localASN: 65001
    # exportPodCIDR: true
    serviceSelector:
      matchExpressions:
        - operator: NotIn
          key: dummy
          values:
            - dummy
    neighbors:
    - peerAddress: "169.254.1.1/32"
      peerASN: 65000
      connectRetryTimeSeconds: 120
      holdTimeSeconds: 30
      keepAliveTimeSeconds: 30
      gracefulRestart:
        enabled: true
        restartTimeSeconds: 120
---
apiVersion: "cilium.io/v2alpha1"
kind: CiliumBGPPeeringPolicy
metadata:
  name: worker
spec:
  nodeSelector:
    matchLabels:
      kubernetes.io/hostname: cilium-bgp-cp-worker
  virtualRouters:
  - localASN: 65002
    # exportPodCIDR: true
    serviceSelector:
      matchExpressions:
        - operator: NotIn
          key: dummy
          values:
            - dummy
    neighbors:
    - peerAddress: "169.254.2.1/32"
      peerASN: 65000
      connectRetryTimeSeconds: 120
      holdTimeSeconds: 30
      keepAliveTimeSeconds: 30
      gracefulRestart:
        enabled: true
        restartTimeSeconds: 120
---
apiVersion: "cilium.io/v2alpha1"
kind: CiliumBGPPeeringPolicy
metadata:
  name: worker2
spec:
  nodeSelector:
    matchLabels:
      kubernetes.io/hostname: cilium-bgp-cp-worker2
  virtualRouters:
  - localASN: 65003
    # exportPodCIDR: true
    serviceSelector:
      matchExpressions:
        - operator: NotIn
          key: dummy
          values:
            - dummy
    neighbors:
    - peerAddress: "169.254.3.1/32"
      peerASN: 65000
      connectRetryTimeSeconds: 120
      holdTimeSeconds: 30
      keepAliveTimeSeconds: 30
      gracefulRestart:
        enabled: true
        restartTimeSeconds: 120
---
apiVersion: "cilium.io/v2alpha1"
kind: CiliumBGPPeeringPolicy
metadata:
  name: worker3
spec:
  nodeSelector:
    matchLabels:
      kubernetes.io/hostname: cilium-bgp-cp-worker3
  virtualRouters:
  - localASN: 65004
    # exportPodCIDR: true
    serviceSelector:
      matchExpressions:
        - operator: NotIn
          key: dummy
          values:
            - dummy
    neighbors:
    - peerAddress: "169.254.4.1/32"
      peerASN: 65000
      connectRetryTimeSeconds: 120
      holdTimeSeconds: 30
      keepAliveTimeSeconds: 30
      gracefulRestart:
        enabled: true
        restartTimeSeconds: 120
2
3
4
5
6
7
8
9
10
11
12
13
14
15
16
17
18
19
20
21
22
23
24
25
26
27
28
29
30
31
32
33
34
35
36
37
38
39
40
41
42
43
44
45
46
47
48
49
50
51
52
53
54
55
56
57
58
59
60
61
62
63
64
65
66
67
68
69
70
71
72
73
74
75
76
77
78
79
80
81
82
83
84
85
86
87
88
89
90
91
92
93
94
95
96
97
98
99
100
101
102
103
104
105
106
107
108
さらに、ロードバランサーサービスが利用するアドレスを定義した CiliumLoadBalancerIPPool リソースを作成します。
今回は 10.254.0.0/24 を設定しました。
実際に運用する際はインターネット接続性をもったアドレスなどになります。
apiVersion: "cilium.io/v2alpha1"
kind: CiliumLoadBalancerIPPool
metadata:
  name: "default-pool"
spec:
  cidrs:
  - cidr: "10.254.0.0/24"
  - cidr: "fd00:10:254::/64"
2
3
4
5
6
7
8
一連の Kubernetes リソースは Makefile 内では以下のように適用しています。
$(KUSTOMIZE) build $(MANIFESTDIR) | $(KUBECTL) apply -f -
# まとめ
本記事では Cilium の BGP Control Plane 機能を試してみました。 割と自由に動かせる環境が手に入ったので色々いじって遊んでみようと思います。 Containerlab 便利ですね。
BGP Control Plane 使ってみた系の記事は英語の記事だといくつか見つかりました(英語もまだ情報が少ない気がする)が日本語の情報は少なそうだったので参考になればと思います。